Best Ubuntu 24.04 PHP Setup – Default Version and Install Older Versions
In this guide, we want to discuss Ubuntu 24.04 PHP Setup including what is the default version, how to install it, and if you need older PHP versions, you will learn how to set it up. As you must know, PHP is a popular, free, open-source, and cross-platform scripting language. PHP is known for its ease of use, flexibility, and ability to be embedded directly into HTML.
Default PHP Version in Ubuntu 24.04
Let’s start with the default PHP version on Ubuntu 24.04. You must access your server as a root or non-root user with sudo privileges. Then, open a terminal and follow the steps below.
Ubuntu 24.04 ships with the latest PHP version which is PHP 8.3. You can read more about this current stable version of PHP on Introducing PHP 8.3.
First, you need to run the system update and upgrade by using the following command:
sudo apt update && sudo apt upgrade -y
Then, you can easily use the following command to install the default PHP:
sudo apt install php -y
Once your installation is completed, you can verify your Ubuntu 24.04 PHP Setup:
php -v
You must see that your default PHP version is PHP 8.3:
Also, if you want to install PHP extensions, you can use the command below to install the most common PHP extensions:
sudo apt install libapache2-mod-php php8.3-common php8.3-cli php8.3-mbstring php8.3-bcmath php8.3-fpm php8.3-mysql php8.3-zip php8.3-gd php8.3-curl php8.3-xml -yTest PHP 8.3 Installation on Ubuntu 24.04
At this point, you can create a test PHP file in the Web root to see if PHP working correctly. First, you need to install Apache and enable it by using the following commands:
# sudo apt install apache2 -y
# sudo systemctl start apache2
#sudo systemctl enable apache2
Then, you need to create a php.info file in the web root directory. You can use Vi Editor or Nano Editor:
sudo vi /var/www/html/info.php
Add the following PHP code to the file:
<?php
phpinfo();
?>
Once you are done, save and close the file. Then, restart Apache to apply the changes:
sudo systemctl restart apache2
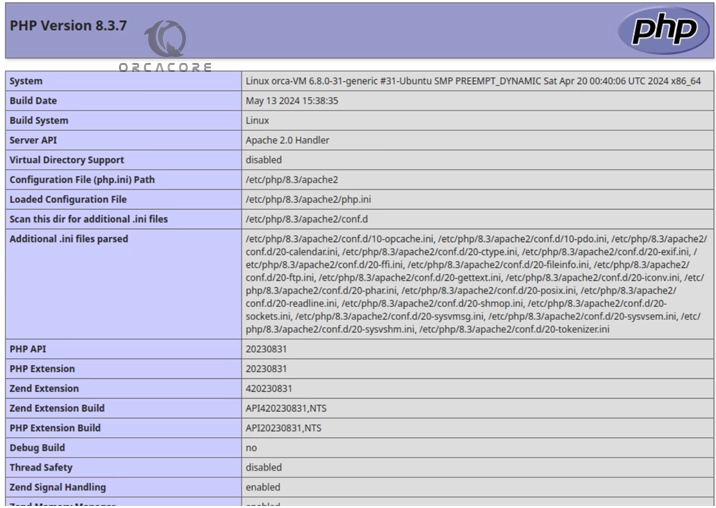
Now you can open your desired web browser and follow the URL below to read your PHP info file:
http://localhost-or-ip/info.php
You should see the following screen:

It means that you have successfully finished Ubuntu 24.04 PHP Setup.
Ubuntu 24.04 PHP Setup – Older PHP Versions
At this point, if you plan to use the older PHP versions on Ubuntu 24.04, you need to remove the PHP version installed on your server, then, add the PPA Odrenj repo, and install other PHP versions. To do this, follow the steps below.
First, remove the PHP version installed on your server with the following command:
# sudo apt purge php8.* -y
# sudo apt autoclean
# sudo apt autoremove
Then, install the following required packages:
sudo apt -y install lsb-release apt-transport-https ca-certificates
Next, you need to add the PPA repository with the following command on Ubuntu 24.04:
sudo add-apt-repository ppa:ondrej/php
Once you are done, run the system update to apply the changes:
sudo apt updateInstall PHP 8.2 / PHP 7.4 on Ubuntu 24.04
At this point, you can easily use the following commands to install your desired PHP version.
For PHP 8.2, you can run the following command:
sudo apt install php8.2 -y
For PHP 7.4, you can easily run the command below:
sudo apt install php7.4 -y
Then, you can verify your PHP installation by checking its version.
That’s it, you are done. For more information, you can visit the official website.
Conclusion
At this point, you have learned Ubuntu 24.04 PHP Setup. As you saw, Ubuntu 24.04 ships with the latest PHP version which is PHP 8.3. Also, if you need older PHP versions for specific apps, you can easily add the PPA repo and install older versions of PHP on Ubuntu 24.04.
Hope you enjoy it. Also, you may like to read the following articles:
Upgrade Default PHP to PHP 8.3 in Debian / Ubuntu
Install PHP 8.3 on Centos 7
Best Way To Get PHP 7.4 on Debian 12 Bookworm
